Last night, Jill and I were in the mood for spring. So what else better to do, than craft some springy decorations?
We made some great recycled flower garlands that are really simple (so simple that you can successfully make them, with a glass of wine in your hands...)
Here is our step by step project:
Recycled Flower Garland
Several colors of scrap fabric (we used old t-shirts!)
Scissors
Needle
Thread
Ribbon or long strip of fabric (for the garland)
To make one flower:
1. Cut fabric into circles, using the spool of thread base, as a pattern. You need between 6 and 8 circles per flower.
2. Fold the circle in half. Fold in half again, so the circle is folded in quarters. This creates "petals".
3. Sew through the pointed corner of the fabric circle, and do this for each circle, until you have all 6 circles (or more), folded in quarters, and on the thread.
4. Pull the thread tight, bunching all the petals together. Tie the thread tightly to secure.
To make garland:
Make about 10-15 flowers, depending on the length of your garland. Tie each flower onto garland about 10 inches apart. Then, its ready!
Who knew! It is simple to make your own hashbrowns. And the best part is, that you can freeze them, and use them when ever you want. As a college student this is so helpful, since I am often running late in the morning, and this is a quick way to make a delicious breakfast complete.
Also, this is a great way to save potatoes that are about to go bad. You know, when they start growing eyes...
Frozen Hash Browns
Potatoes (un-peeled*)
Salt
Water
Olive oil
1. Clean potatoes and dice them (or grate them, for thinner potatoes) into small cubes. The size is up to you and your preference. I made cubes about 1/4".
2. Boil water with a pinch of salt. Add potatoes and boil them until they are just tender (not too mushy).
3. Remove from heat, and strain water off of the potatoes.
4. Grease a cookie sheet with olive oil and spread the potatoes evenly, in a single layer. Freeze potatoes on cookie sheet.
-When they are frozen, you can scrape them in a bag or tupperware, for easy storage. Freezing them on a cookie sheet keeps them from freezing into one large block. This way, it is easier to take them out as you need them.
-To cook, take your desired amount out of the freezer and cook in a fry pan, with a little olive oil until browned.
*A note on the peels of potatoes. Don't peel 'em! The peels are easily cleaned and store many of the nutrients of the potatoes. By removing the peel you are reducing the nutritional value of the potato. The peels are high in fiber, iron, copper, potassium and many other great nutrients. So don't forget to leave to peel!
Jill and I are constantly making new recipes! This is great, until our refrigerator is full of leftovers and nothing fresh left to prepare. Last night, we got creative with our leftovers and the results were just delicious! Here is our enchiladas recipe:
1 jar of salsa (we used black bean salsa, but you can use what ever kind you like!)
1/2 cup of Colby cheese, shredded
1. Chop onion. Drain the can of tomatoes. Mix the onion with the black beans and 1/2 of the can of tomatoes. Fill tortillas evenly with this mixture and roll them up. Lay them in the pan side by side, with the seam side down.
2. When the pan is filled with the tortillas, pour the rest of the crushed tomatoes over them, and pour salsa, to taste, over as well. Top with shredded cheese.
3. Bake at 350 degrees, for about 15-20 minutes or until they are warm through.
These are great re-heated too, so it is a simple meal that you can prepare for the week, and snack on throughout the week! Also, if you want, you can prepare the enchiladas and bake them when you are ready to eat them. This way, you can easily prepare extra for another night, and they will be fresh when you want them.
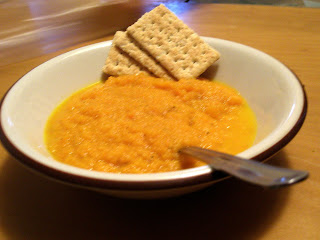
After our long trek home from Moab, Utah, Pat and I and Molly and Nick stopped through in Chicago at Pat's family's home. After a week of campfire foods (I'm not complaining, but just stating the facts), a home-cooked meal was a delight to come home to. Among other delicious things, Pat's mom had prepared this delicious soup. Turns out it is as easy as pie! I am sure that I will be eating a lot of it, in the future. I hope you enjoy.
Easy-as-pie Carrot Soup
2 tablespoons of butter
1 onion, chopped
1 pound of carrots, in 1/2 inch cubes (don't peel 'em, just scrub 'em!)
2 1/2 cups of vegetable broth
1 tablespoon of honey
Juice of one lemon
1. Melt the butter in a sauce pan. Add the chopped onion, and cook until they are transparent.
2. Add the carrots and the vegetable broth and cook until the carrots are cooked through and soft. Remove from heat, and blend into a thick soup.
Hi! This is Jill, another dweller/cook in the garden unit. This seems to be the week of burgers at the g-unit. Inspired by Wednesday's dinner, I decided to try my hand at making black bean burgers. My very first attempt at veggie burgers and it went great- so simple! I followed the guidelines from the Ali's previous post, but made a smaller batch and a few different ingredients.
Black Bean Burger
1/2 can of black beans
1 egg
1/2 can of tomatoes with hot chilies
onion to your pleasing
salt and pepper
dash of chili powder
1/2 cup of bread crumbs & tortilla chips - or more
First, I mashed up the beans and the egg together. I used only one egg and it seemed to work just fine, but I would recommend playing with the consistency. Then add the tomatoes and onion. It would be even better to use fresh tomatoes and peppers- but just work with what is in your pantry.
Then add your seasoning. I went with salt and pepper and chili powder to give it a bit of a kick.
The key to making the veggie burger consistency is the bread crumbs. Add enough until you can make a patty out of the mixture. I crushed up tortilla chips to go along with the bread crumbs. It is all about using what you having and being a little creative. Anything from crackers to chips to bread crumbs. Just make sure it is toasted and will give you a thicker consistency.
Then you are done mixing. So easy! Takes less then 10 minutes. Then just put them in a fry pan with olive oil and brown on each side.
I topped mine with smoked cheddar cheese. Use whatever toppings you like. And then dig in!
Yesterday was nice. It was a bit cloudy, but life is always sunnier, when you are spending time with people you love. And, lucky me! I spent dinner with my mom, Beth and Jill, so life was pretty gosh darn sunny. And dinner was delicious too. This is just the best recipe. Not only is it easy, but it is delicious, healthy, quick and filling (and cheap!). Here is our recipe for garbanzo bean burgers:
Garbanzo Bean Burgers
1 can of garbanzo beans (the same as chickpeas)
4 large organic eggs
1/2 teaspoon of salt
1/2 of an onion, diced
1 clove of garlic, diced
1 cup of sprouts (I used alfalfa sprouts)
Zest of one lemon (this makes all the difference, a great addition)
1/2 cup of bread crumbs* that are toasted
dried oregano, dried basil to taste
olive oil
1. Smash beans and eggs together, until they blend to a thick, chunky "paste". Stir in salt, onion and garlic, until all ingredients are well mixed. Add in the sprouts, zest, bread crumbs and herbs to taste. The batter should be relatively thick. If it is too thin, you can add more bread crumbs. If it is too thick, just add a splash of water!
2. Heat about 1 tablespoon (give or take) of olive oil, in a fry pan, on medium heat.
3. Form burger batter into patties, about the size of a deck of cards. Place the burger patties in the fry pan, and cook covered for about 7 minutes on each side, or until browned. So simple!
We topped ours with some cheddar and Swiss cheese, extra sprouts, pickles, spinach and ketchup and mustard. You might also try tomatoes, avocados, or any other topping you love on your burger. Its so versatile, you could even experiment with different beans in the burger itself. Let me know if you try any other combinations! I would love to hear what you try.
*Bread crumbs do not have to be store bought... They are so simple to make at home, with bread that is either stale, or the butts of the bread loaf. To make them, allow bread to dry in open air, or if you need them sooner, toast bread on low heat, until dried throughout. Then, with dry bread, use a cheese grater to break into small bread crumbs. Bread crumbs last quite a long time. Simply store them in an empty jar with a lid. Just another way to reduce your waste, and use your resources!
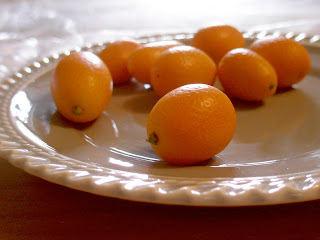
A quirky, funny little fruit to eat, the kumquat is one that you might not know. They were originally cultivated in China, but more recently are cultivated in California, Florida, Louisiana and several Southeast Asian countries.
A kumquat is (as you can see above) quite literally, a little orange! The rind is sweet and the pulp is tart (really tart!). So when you eat them, you just pop them into your mouth, and eat the whole darn thing! Because you eat the peels, they are full of fiber. Also, they are high in vitamins C and A. All in all, they are a fun and mess-free snack.
If you have never had them, they are plenty worth it. To buy them, check your local super market. They are ripe when the peel is yellowish-orange (if there is any green, they are not ripe yet). They are in season from about November to March (so get them soon before they are off the shelves!).
p.s. An interesting tid-bit about citrus fruits... When you open a segment of the fruits (like a section of an orange), they are filled with swollen cells. These cells are the only cell that is visible to the human eye.
Pat and I are back from our spring break trip to Moab, Utah. In Moab we rock climbed almost every day, and hiked and biked and read. It was wonderful. The weather was nice and the scenery was absolutely beautiful. Also, we were lucky that everyone in our group got along well, for the whole week. And! We ate like kings and queens. Every night we prepared a group dinner, which usually consisted of rice and beans, cheese and avocados, fresh vegetables and pita. All in all, we ate really well. Though I must say, it is nice to be home and able to cook on a real stove, rather than over the fire (though this is a fun endeavor!). The stove is a lot quicker, that is for certain.
Tonight Pat and I are making cheesy burgers on garlic knots. A delicious, and easy meal.
We are not eating meat very often (for a variety of reasons: ethical, dietary, environmental, etc.), but when we do, we are using organic free-range beef that is grass fed. Ours is from a local farm, which is also great, because it reduces the distance that the meat had to travel to get to our plate (which is both environmentally better, and we get fresher meat). It's a bit more pricey, but worth every penny. Also, not only does it taste better, but there are health benefits to eating meat that is grass fed. What are these health benefits? First of all, because the cows are open-range, the meat tends to be leaner, which keeps you leaner! Also, a cow's digestive system is intended to digest grasses, not grains. Not only do cows that are fed corn and other grains struggle to digest these foods, but they also store the fats from the grains as omega-6 fatty acids rather than omega-3 fatty acids. When they are grass fed, the cows store the fats as omega-3 fatty acids. In balance, omega-3s and -6s are good for our bodies. Our bodies cannot produce either omega-3 or -6 fatty acids on their own, so we rely on other sources to obtain such fats. Omega-6s are found in grains and some oils. However, it is important to balance omega-3 and -6 fatty acids. A diet rich in omega-6s is linked to many health problems. However, omega-3s are known to aid in memory, cardiovascular health and more. By eating grass-fed beef, you are eating omega-3s. There are many more reasons to eat grass-fed, free-range beef (and other meats too!), so I encourage you to look into your meat sources, before buying.
We topped our burgers with sharp cheddar, onions, and ate them on "garlic knots" that we picked up across the road a locally owned pizza shop! Delicious.
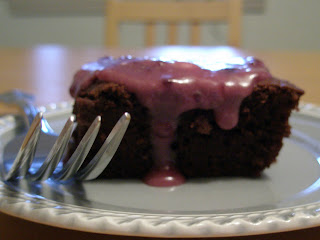
Today, I have a feeling of relief, since I am done with mid-terms and getting ready for spring break, which begins this Thursday. So what better to do with my time, than bake some deluxe brownies? The weather outside is a bit glum, so I feel even better, spending time in the kitchen!
Today I made Cocoa Mascarpone Brownies, with a creamy Raspberry Jam frosting. This is the best brownie recipe that I have ever made. A thousand times better than any brownie from a box.
You will see that I have listed a few of the ingredients as "fair trade". What does fair trade mean? Well, you see. Fair trade certified products are products that are produced in a foreign country and are certified to have been fairly traded, by a third party organization. That is, the product has been traded in a way that ensures the farmer receive a livable wage. With fair trade, the farmer is connected directly to the buyer, and is paid market price for their goods. With out fair trade certification, farmers often rely on middle-men to transport their goods to the market. Because the middle-man has the upper hand, he is able to pay the farmer a low price, and sell the product for a higher price, keeping the profits for himself. Fair trade has many other benefits as well. For example, fair trade certification parties help to establish community cooperatives, and aid in the building of schools and religious centers in the communities. By supporting fair trade, you are supporting the alleviation of the farmers who feed our planet. You can buy several of your products as fair trade, including tea, coffee, chocolate, vanilla, sugar, cotton, and many more! Look for this label, to support fair trade:
Cocoa Mascarpone Brownies
1 cup of unsalted butter
3 ounces of semisweet organic, fair trade chocolate chips
1 cup of fair trade sugar
1/2 cup of mascarpone cheese
3 farm fresh eggs, at room temperature
2 teaspoons of fair trade vanilla extract
1/2 cup of white flour
1/4 teaspoon of salt
1. Preheat the oven to 325 degrees, and butter a 8 x 8" glass cake pan.
2. In a small pan, melt the butter. Place the chocolate chips in a large mixing bowl, and pour the hot butter over the chocolate chips. Let stand for about 30 seconds, and stir until chocolate is completely melted.
3. Sift the sugar and cocoa powder into the butter and chocolate mixture. With a mixing spoon, blend in the mascarpone, eggs and vanilla, until this is smooth.
4. Gently fold in the flour and salt into the batter. Pour the batter into the pan and spread evenly.
5. Bake for 45 minutes or until a toothpick comes out clean from the center.
Raspberry Jam Frosting
1/3 cup of mascarpone cheese
1/3 cup of cream cheese
1/3 cup of black raspberry jam (though you can use any type of jam!)
2/3 cups of powdered sugar
1. Mix all the ingredients together.
2. Spread evenly over your brownies, when the brownies have cooled.
ENJOY!
They are so easy and so delicious; your only problem will be limiting yourself to just one...
I have been concerned with the health of the planet since I was in the 7th grade. It was at that point, that I realized that I was a member of a living earth, and that my actions necessarily have an impact on this planet. In recognizing this, I have become more aware of my daily actions, and with deliberate actions I strive to live in a way that is symbiotic rather than parasitic, to the planet.
This weekend, I attended the Ignatian Solidarity Network's conference on Climate Change and Social Justice, in Wheeling, West Virginia. I was sponsored to go by my school's Center for Peacemaking. Though I have frequently contemplated the idea of my actions being unjust to the planet, I have spent very little time contemplating the relationship between my actions and social justice. That is, does my decision to be wasteful negatively harm my fellow citizens of this earth? What I have learned this weekend, is that there is a very close connection between my decisions regarding the environment, and the repercussions my actions have on the poorest of poor.
For example, water. One of the keynote speakers this weekend suggested water as the universal language of the world. Every human being needs water to survive. When we are feeling unclean, we bathe in water. When we want to be rejuvenated, we go to lakes and oceans, filled with water. When we need to grow food for our families, the food relies on water to grow: we rely on water to survive. And yet, we have an unhealthy relationship with water.
In America, water is at our fingertips: literally. If we want water, we turn on the faucet and water runs freely, and freshly. But if we continue to treat the planet as we have been, with mountain top removal releasing harsh chemicals into our water table, with our over consumption, with our demand for water-intensive, disposable products, like water-bottles, we are going to destroy our supply of water. And our water supply does not only belong to us, but to the citizens of the planet, rich and poor alike. We will destroy the single thing that unites our planet. Consider this:
Only once we are able to accept that our current consumption levels are unsustainable, will we know how to address the global implications of our actions. Simply by reducing the amount of trash we generate, through consumption of single-use, disposable products, we can change our relationship with water, and with the world. However, if we continue to consume the way we are, then the people of the world will suffer from our actions. This is no way to live on this living Earth. This is no way to show respect for the planet as it has been created.
Environmental degradation is in our hands: if we do nothing about it, we are not only acting violently against our earth, but violent against humanity. With our disposable lifestyle, we are out of equilibrium with the planet and acting in a way that suggests that we are the dominant force of nature. Let us remember our true place in the world: a member of this global ecosystem. Throwaway lifestyles lead to throw away communities. Humans are not a commodity, and communities should be preserved. We can do this. We can live deliberately and simply, so that others may simply live.
Let peace and justice prevail on earth: live deliberately.
Tonight, my dear friends and I biked and enjoyed the sunny day. The weather is really looking beautiful. My friends are even more beautiful. I love them all.
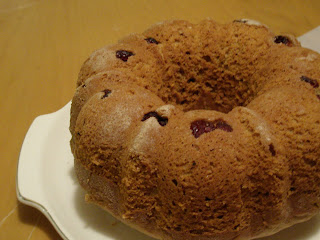
Tonight, my dear roommate Jill made a beautiful bundt. She loves to make bundts and has made her fair share, over the past year. This is much to my delight, because they are wholesome and delicious. Tonight, she has crafted a sweet potato bourbon bundt (from marthastewart.com) plus some modifications! One thing I learned recently, is that for baking, it is better to use ingredients that are room temperature. Apparently this allows the necessary chemical reactions that need to occur for your baked good to be successful, to happen! So with that new little tidbit, here is the new recipe that we have constructed, based on Martha's recipe:
Jill's Sweet Potato and Banana Bourbon (bodacious) Bundt
1 1/2 cups of packed brown sugar
1/3 cup of butter, softened, plus some more for your bundt pan
2 farm fresh eggs
1 cup of cooked sweet potato
1 brown banana
1 teaspoon pure vanilla extract
2 3/4 cups whole wheat flour
3/4 cup milk
1/3 cup bourbon
1 tablespoon baking powder
1 pinch of cloves
1 teaspoon of cinnamon
3/4 teaspoon salt
Some dried cranberries
1. Preheat oven to 325 degrees. Mix together the brown sugar, butter, and eggs until they are very light and fluffy.
2. Add the sweet potato, banana and vanilla and beat to combine.
3. Add the flour, milk, bourbon, baking powder, cloves, cinnamon, and salt and mix until they are just mixed in. Also, add your dried cranberries, or what ever dried fruit you might be wanting!
4. Lightly coat the bundt pan with some butter, and sprinkle the bottom with some flour. This helps to make the bundt slide out of the pan, when you are done baking it! Jill sprinkled some dried cranberries to the bottom of the bundt pan, so that they would be nestled in dough on the top of the bundt when it is finished! Then, you can pour in cake batter.
3. Bake until a toothpick inserted in the center of the cake comes out clean. This is about 50 to 60 minutes. Allow this to cool for 10 minutes. Ready to go!
Yesterday was a bit hectic, so although I had time to cook, I had zero time to write about it! This morning I have one of my biggest midterms.
Last night, Pat and I made a tasty soup. It was great, because I was able to use a bunch of foods that I had in my refrigerator that were needing to be used anyways. Plus, I used, for the first time since I was home from my trip, my spices from India! And who doesn't love a warm bowl of soup on these cold winter days?
On the side, we had roasted pumpkin. Squashes are great, because you can store them for such a long time, and they are just loaded with flavors! This little pumpkin that I cooked up, is from fall! And it was perfect for use, in March. I hope you enjoy these new recipes:
Spicy Spinach and Rice Soup
4 cups of vegetable broth
1/2 tablespoon of salt
1 large bunch of spinach
1 medium onion, chopped
1 tablespoon of butter
1 teaspoon of masala spices (or) 1 teaspoon of curry powder
2 cups of precooked rice
1. Bring the vegetable broth to a boil. Add spinach and simmer for about 5 minutes.
2. Meanwhile, in a fry pan, melt butter and cook onions until they are transparent. Add to the broth and spinach.
3. Add masala and rice. Serve hot!
Roasted Pumpkin
1 small pumpkin
Olive oil
Chili powder
Pepper
Salt
1. Preheat the oven to 450 degrees. Chop and peel pumpkin into about 1" cubes.
2. Put in oven-proof glass pan, and drizzle with olive oil, until all the pieces are coated with olive oil.
3. Sprinkle with chili powder, pepper and salt, to taste. The pumpkin pieces should have a good layer of spices on them!
4. Pop in the oven for about 30 minutes. After 30 minutes, take out and re-drizzle with a bit more olive oil and stir.
5. Allow to cook for about 15 more minutes or until the pumpkin is cooked through.
The great thing about all of these recipes is that I am just choosing spices that I like. You can do the same thing! Experiment with spice combinations that you like, and mix up the recipes a bit. I'm sure you would never read this advice in a cookbook, but this is not a cookbook. This is just a bunch of recipes that a college student posted on the web. So play around with these recipes until you find something you just love! Thats all for now, byebye!
Today, I shared my meal with my friend and neighbor, Bridget. For lunch we had a salad. But afterwards, we made homemade tortillas, with our dearest friend Lauren's recipe! So easy and so wonderful.
Lauren's Tortillas
1 1/2 cups of flour (we used whole wheat flour)
1/2 teaspoon of salt
1 pinch of baking powder
1 teaspoon of oil
water
1. Mix together, the dry ingredients.
2. Add the oil, and mix. Add water, tablespoon at a time, until you have a dough (not too sticky!). If it becomes sticky, don't worry! Just add a bit more flour.
3. Form dough into small balls, and let sit for a few minutes. (This will help them to be soft instead of gummy when you cook them)
4. Roll out each ball about 1/8" thick. (I don't have a rolling pin, so I just used a tall drinking glass)
5. Cook individually over medium low heat on both sides until they begin to slightly brown on each side.
These are so simple, I will probably never buy store bought ones again! Also, we made them with some spices: cinnamon and nutmeg. You can experiment with this base recipe.
Mondays are a bit hectic for me. Today I was in class from 8 am to 8 pm. Fortunately I was able to squeeze a small nap into the day, to keep me going!
In my evening class, the editor of Astronomy Magazine was a guest speaker. There were some interesting facts that he presented to us. Did you know that the universe is in a constant state of expansion? And that the rate of expansion is accelerating? Well, its true, and its mind boggling. Also, there will be a meteor shower in April. It is called Lyrids, and will be most visible from the 21st through the 22nd.
I did not prepare any exciting recipes for meal time today, but Jill and I are currently sipping on a mug of my dad's chai recipe. He loves to make it for me (it is kind of our way of bonding... I sit in the kitchen, while he makes me tea. it is most wonderful). And the smell of chai is a great smell to have in your apartment throughout the night.
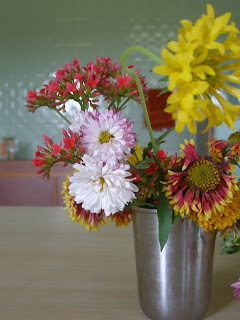
The recipe itself, was taught to my dad, by my aunt who is from India. When I was in India this winter, I enjoyed about 5 cups of chai DAILY! You might think this would cause a chai-overdose, but for me, it was just what I needed. And my dad's recipe is not far from the recipe they used in India. For this recipe, you can use either cardamom or ginger. In India, ginger is primarily used in the summer months, while cardamom is used in the winter months. The main difference that I noticed was that in India, the tea is mostly milk, with a small amount of water. Here I boil the tea leaves in water, and add a small amount of milk to it. I hope you can find time to enjoy this recipe!
These flowers were on our tea table in India, grown in the garden at the school that we visited. A bright and delightful surprise, to our daily tea time.
Dad's Chai Tea
4 cups of water
1 tablespoon of Red Label tea
1 tablespoon of Green Label tea
4 green cardamom seed pods, crushed
(or) 1 teaspoon of fresh ginger, grated
Sugar to taste
A splash of milk or cream or soy milk
1. Pour water into small sauce pan. Spoon Red Label tea, Green Label tea and cardamom or ginger into water.
2. Bring water to a boil. Allow to simmer for about 3-5 minutes (depending on how strong you want it).
3. Strain tea into a mug, about 3/4 of the way full. The left over tea can either be re-boiled (do this the same day) or composted.
4. Add sugar to taste, and milk to fill the mug. Enjoy!
This is a great drink to share with friends, and it is easy, so easy! If you plan on making a lot, you can prepare a 1-part-Red Label, 1-part-Green Label mix, and just scoop that into the water. Also, experimenting with other types of tea flavors is fun. Rooibos is a nice add. Last night, we added a bit of vanilla extract, and it was great.


